
Imagine this: you’re driving your trusty 2008 Honda CR-V on a sunny day, enjoying the open road. Suddenly, your radio cuts out, and your headlights dim. Panic sets in, but then you remember – you’ve got a backup plan! You pull over, grab your trusty owner’s manual, and turn to the fuse box diagram. This little diagram is your lifesaver, guiding you through the intricate web of electrical connections in your car, helping you identify and fix the issue. Today, we’ll delve into the world of the Honda CR-V 2008 fuse box diagram, exploring its significance and providing you with all the information you need to become a fuse-fixing pro.

Image: wirelistzapotilla.z13.web.core.windows.net
The fuse box diagram is essentially a map of your car’s electrical system, showing the location of each fuse and the circuits they protect. Understanding this diagram is crucial for any CR-V owner, especially those who like to handle basic car maintenance themselves. It allows you to quickly diagnose electrical issues, replace blown fuses, and get back on the road in no time. Armed with this knowledge, you’ll feel empowered to tackle even the most intimidating electrical problems, saving you time and money on potentially expensive trips to the mechanic.
Understanding the Honda CR-V 2008 Fuse Box Diagram
The 2008 Honda CR-V has two fuse boxes: one located in the engine compartment and another inside the vehicle. The engine compartment fuse box is responsible for protecting essential components, including the headlights, engine, and power steering. The interior fuse box, often found near the driver’s side footwell, takes care of accessories like the radio, power windows, and the interior lights. Each fuse has a specific amperage rating, indicating the maximum current it can handle before blowing. The fuse box diagram clearly labels each fuse, its amperage, and the circuit it protects, making it easy to identify and replace blown fuses.
Decoding the Fuse Box Diagram
The fuse box diagram is typically printed in your car’s owner’s manual, and it’s also readily available online through various sources like Honda’s website or third-party automotive websites. It usually includes a visual representation of the fuse box with labeled fuses, along with a table that lists each fuse’s number, amperage, and the circuit it protects. Understanding the symbols and their designations is vital for using the diagram effectively. This diagram is critical for performing basic troubleshooting and repairs, allowing you to save money and time when it comes to your car’s electrical system.
Using the Fuse Box Diagram
Once you’ve located the fuse box and obtained the diagram, you’re ready to start troubleshooting. If you’re experiencing an electrical issue, the fuse box diagram will guide you to the appropriate fuse for the circuit in question. Simply follow the steps below:
- Identify the circuit that’s not working. For example, if your headlights are out, you need to find the fuse that protects the headlamp circuit.
- Locate the fuse number on the diagram. It will correspond to a specific fuse in the fuse box.
- Carefully remove the fuse from the fuse box using a fuse puller or pliers.
- Inspect the fuse for signs of a blown fuse. A blown fuse will exhibit a melted wire or a broken filament.
- Replace the blown fuse with a fuse of the same amperage. Using a fuse with a higher amperage can damage your car’s electrical system.
- Test the circuit to see if the problem is resolved. If it’s not, you may have a more significant electrical issue that requires professional attention.
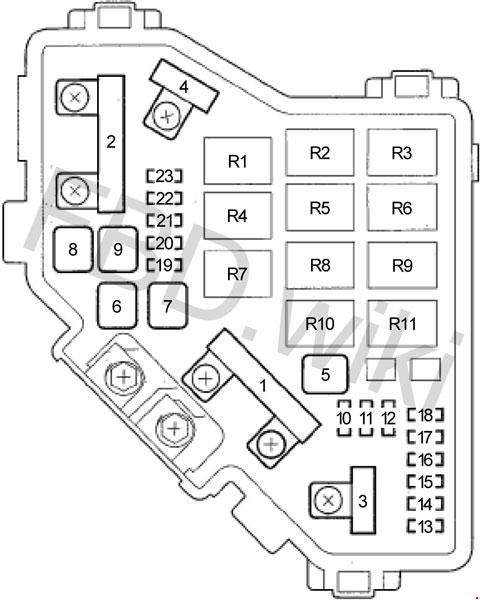
Image: enginebusch88.z19.web.core.windows.net
Safety Precautions
Before working on your car’s electrical system, it’s crucial to prioritize safety. Always disconnect the battery’s negative terminal first to avoid electrical hazards. Use gloves and a fuse puller to handle fuses safely. Never attempt to repair a blown fuse. Instead, replace it with a new fuse of the same amperage.
Additional Tips
Keeping a spare set of fuses in your car is always a good idea, especially for common fuses like those for headlights, taillights, and power windows. Make sure the fuses you’re using are compatible with your Honda CR-V, and ensure they’re the correct amperage for each circuit. Consider purchasing a multimeter to test the functionality of fuses and circuits. This handy tool can help pinpoint electrical problems and confirm whether the issue is truly a blown fuse or something more complex.
FAQ: Honda CR-V 2008 Fuse Box Diagram
Q: Where can I find a Honda CR-V 2008 fuse box diagram?
A: You can find a detailed diagram in your CR-V’s user manual or readily access it online through Honda’s official website or reputable automotive websites.
Q: How can I tell if a fuse is blown?
A: A blown fuse will typically exhibit a melted wire or a broken filament. You’ll notice a visible gap or burn mark on the fuse.
Q: Can I replace a blown fuse with one of a higher amperage?
A: Absolutely not! Using a higher amperage fuse can cause damage to your car’s electrical system. Always use a fuse of the same amperage as the original.
Q: What should I do if I can’t find a blown fuse?
A: If you’ve checked all the fuses related to a specific circuit but can’t find a blown fuse, there may be a more significant electrical issue. It’s best to take your CR-V to a trusted mechanic for professional diagnosis and repair.
Honda Crv 2008 Fuse Box Diagram
Conclusion
Knowing your Honda CR-V 2008 fuse box diagram is truly invaluable. It gives you the power to diagnose and address electrical issues independently, saving you time and money. Understanding this vital diagram empowers you to become a more confident and informed car owner. Have you found this blog post informative and helpful? Let us know in the comments below!

")
")


